
 Latest images
Timescape Normal/Hard
Valkyrie :: Guides :: Dungeon Guides
Page 1 of 1

Timescape Normal/Hard
![]() by Dignity Sat Nov 07, 2015 1:04 am
by Dignity Sat Nov 07, 2015 1:04 am
Three Spheres
There will be three spheres in this room. I will refer to them relative to the position you are before you go into the room. The closest one is 'left'(1), the second closest is 'right'(3) and the farthest is 'back'(2)
Orbs 1 and 2 will have an orange shield around them. The shield inflicts a fixed damage of 10k every time you hit it. (3 mil thunder strike will return the same damage as a 20k auto attack and if you have something that hits a lot of times like warrior's traverse cut or gunner's arcane barrage with HB out, you're as good as dead) The unshielded orb will spawn mobs once it reaches a certain hp. Mobs will also spawn after a fixed amount of time. Each orb has a mechanic. The mechanic can either be the donut, ring, stun/sleep, or dot.
Donut: if it has been cast on you, don't move because the donut moves with you and you might just end up killing your team if you dance and prance around like a madman.
Ring: if it has been cast on you, count 4-4.5 pulses then iframe or you will receive 40k damage.
The mobs hit hard and spawn continuously so either have the tank kite them or control them with stuns/staggers/knockdowns which they are easily susceptible to.
There are multiple ways to clear this room.
1. Attack orb 1 (slowly so the healer can keep up with the damage you are receiving) until it is about to be destroyed
2. Move on to orb 2 and repeat step 1
3. destroy the unshielded orb 3 as quickly as possible and then the other two
1. Attack orb 1 until it is about to be destroyed
2. Move on to orb 2 and repeat step 1
3. Have a gunner use balder's vengeance on orb 1 and 2 and the healer sleep/stun orb 3, then dps orb 3 as quickly as possible.
1. Destroy orb 1
2. Destroy orb 3
3. Destroy orb 2
Hemera
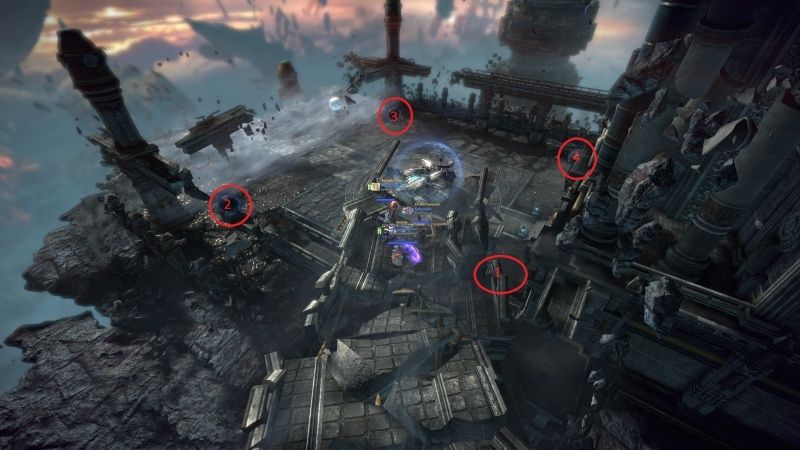
There will be four orbs like the ones in the sphere room, but they will play a different role here. Overlooking from the bridge, the orb closest to you will be orb 1 while the one on the left is orb 2, the one on the right is orb 4 and the farthest one is orb 3.
Orb 1: stun/sleep
The stun/sleep countdown lasts 5 seconds, if it is not cleansed by then, a stun/sleep is received which cannot be cleansed.
Orb 2: large donut
There will be a large donut around the tank. Healers and ranged stay outside of it while melee dps stay inside. (Don't move if you're the tank)
Orb 3: dot
Debuffs players with DoT, bleed, sleep. cleanse as soon as possible
Orb 4: small donut
The small donut lasts for 5 pulses then explodes damaging the tank and everyone else in the AoE and cannot be blocked but CAN be iframed
Positioning:
In timescape normal mode, you will only be using orbs 2 and 4 because their mechanics are easy to deal with in comparison to orbs 1 and 3. The tank/person with highest aggro will always be the victim of the orb mechanic.
The tank will want to bring the dragon to orb 2 and then orb 4 ignoring orbs 1 and 3. (Position the dragon so the dps can back crit but avoid hitting the orb)
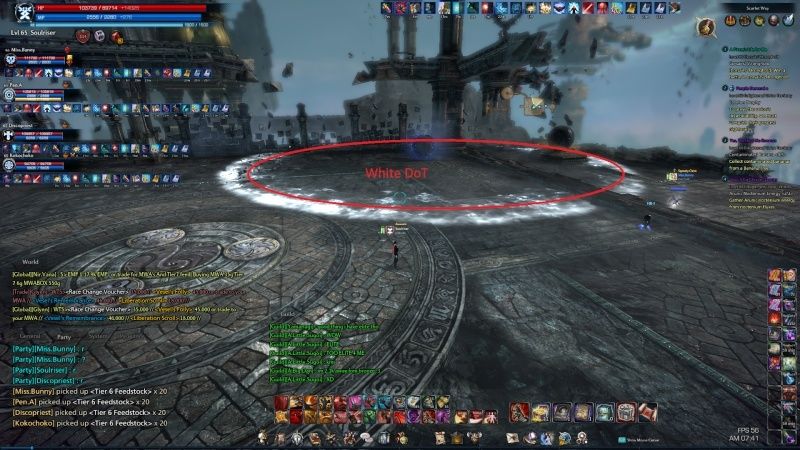
Once orb 2 is about to explode, a message will display telling you it is about to explode. Make sure the orb explodes before you leave because if it is not destroyed, it will not recover hp. When the orb explodes, it will leave a large white DoT area.
Once orb 2 has exploded, move onto orb 4 until it too explodes. If both orbs are recovering hp, simply kite the dragon until one of them is fully recovered.
Noteworthy Attacks:
Shield/Orbs- There will be a blue shield around Hemera whenever he is not near an orb. It inflicts fixed damage of 10k every time you hit it, so don't hit it.
To make the shield dissipate, the tank needs to lure Hemera to one of the orbs. The orbs will receive damage while he is near them and the orbs can also be damaged by player attacks. (Do NOT attack the orbs)
Tail 'Bitch Slap'- does around 30-40k damage
Whirlwind- Below 50% hp, He sucks up air and releases, pushing you away and dealing heavy damage (70k)
"We will meet again"- Hemera flies up and comes back down to attack and then leaves a dot on the ground. Stun him as soon as you see this message.
Arcane Vomit- He spits out 3 electric balls dealing heavy damage (You can tell by secondary purple aggro circle)
Hard Mode:
After defeating Hemera, his brother Emeres will spawn. Emeres is considerably stronger. His "We will meet again" phase cannot be canceled via stun. He deals 30-40k damage in normal attacks.
Positioning:
There are two positions which you will be using for Emeres. Each entrance will be surrounded with a large red DOT. To prevent being damaged by this, or preventing your healer from cleansing you, you must position yourself closer to the middle instead of at the end.
Noteworthy Attacks:
(Tank)"We will meet again"- Eremes flies up into the air and shoots short-lived DOT puddles in the direction he is facing. The tank must have Eremes face away from the rest of the team until he starts to fly, which locks him in animation. After he is locked in the animation, simply move away and resume position.
Skadoosh- Whenever Eremes lands(he has to come down to land whenever he flies up), he will do a colossal amount of damage capable of one hit ko's, so make sure to either get out of the immediate area or block it.
Normal Attacks/Tail Swipes- These hit hard. Tank should try to take as little damage as possible or else healer won't be able to keep up and once tank dies, everyone is doomed.
(Healer)Steroids- When the spheres explode, Eremes will receive a buff. The buff lasts 5 seconds and can be plagued(priest)/regressed(mystic). If you do not get rid of the buff in time, he will receive a 30 second buff which debuffs your team with bleed and 1hko's which need to be cleansed.
Orb effects- All the effects of the orb will occur throughout the battle and the healer must be prepared to cleanse everyone within 5 seconds but it is also the dps/tank's job to gather as to make it easier on the healer. If you get the ring, it explodes on the fifth pulse so iframe it on the 4th while transitioning into the 5th.
When an orb is destroyed, it will say "The orb protects and empowers the Dark-World Dragon" You can also just look at the gigantic red aoe
Timelost Meadow
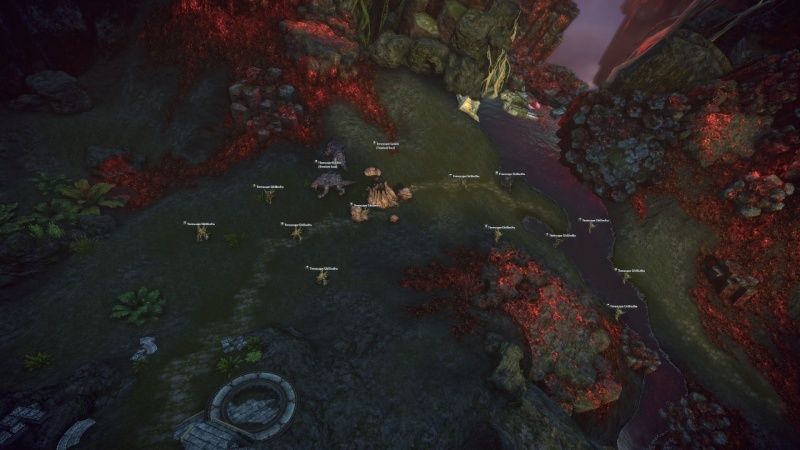
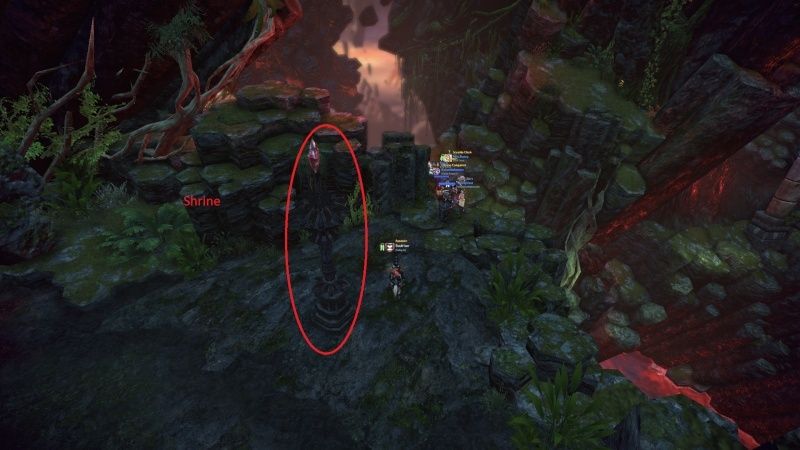
There will be a bunch of trash mobs. Gather, bring them to the destination, kill them until the Timelost Soul bar fills up to 100. After the bar fills up, interact with the shrine to despawn all the mobs.
Tempas
Positioning:
(Warning) Sometimes he can push you even though the tier 8 update was supposed to make tanks immovable. It's seemingly random so just hope for the best?
1. In the middle, stack his poison breath on top of each other and simply step to the side when he does it covering up 3 sides max but leaving one to escape.
2. Each wall that isn't an entrance
3. Wherever you can find empty space
Modified Positioning: Tank in the middle of the room until you feel that you are running out of space or something goes wrong and you need to reposition. Move to the walls. If you have decent dps, this way of positioning should take him from 100% to 0% hp without ever having to worry about poison pools.
Noteworthy Attacks:

Purple Vomit- a normal breath attack common to all kumases, this one takes it a step farther and vomits on the ground creating a dot puddle. (dot can be cleansed and puddles eventually disappear)
Fake Purple Vomit- He does the purple vomit animation but spits out nothing
You can tell if he's going to use purple vomit by looking for the poison symbol

Lightning Orbs- Everytime you are caught in purple vomit, a lightning orb will spawn. Lightning orbs can be destroyed and debuffs like slows, stuns, etc. will drive them crazy and they will stray from their circular path for a short amount of time.
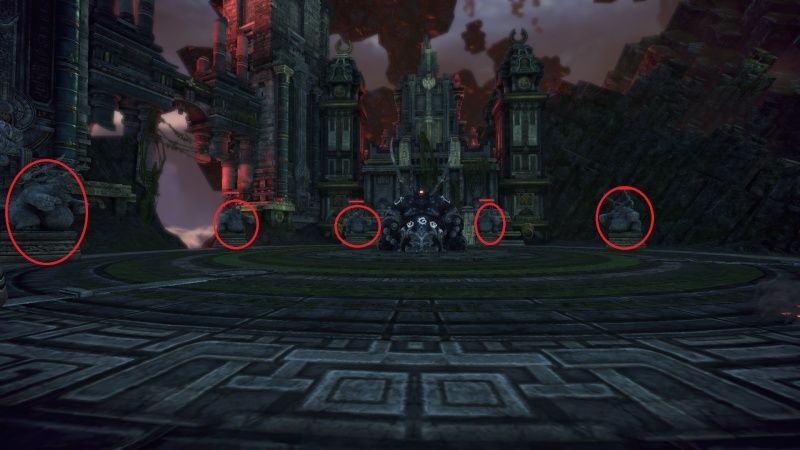
Kumas Statues- Once a lightning orb comes into contact with a kumas statue, the statue will shoot a line of electricity that deals 15k damage to a seemingly random target.
Up, Up, and Away- He jumps up into the air and upon hitting the ground, sends you flying upwards. Iframe it (While in the air you are vulnerable to other attacks)
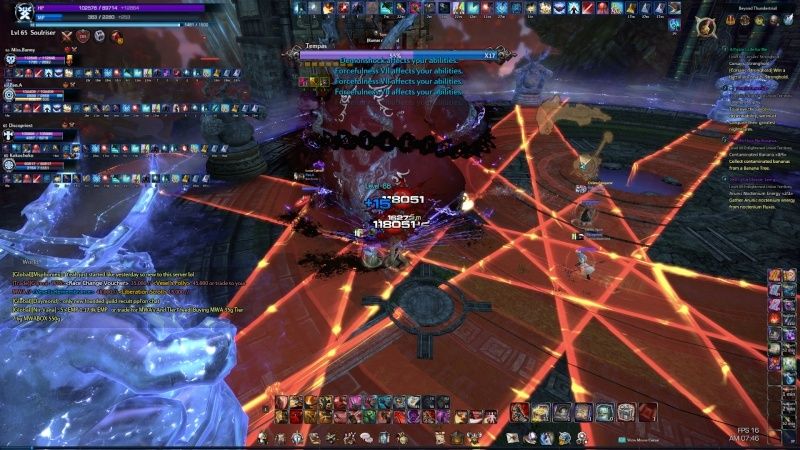
"Fools! I am the storm incarnate"- He does 'Up, Up, and Away but this time if you get hit, you will receive a debuff. He also sets off all the kumas statues. Lasers everywhere
Hard Mode:
On hard mode, many attacks/mechanics aren't iframeable so instead of iframing the lasers or iframing Tempas' jump in "storm incarnate", you must simply move out of the way of lasers and facetank the jump damage and debuff. It is important to make it easier for your healer to cleanse/heal you so try to stay together.
Noteworthy Attacks:
(Tank)Normal Kumas Attack Patterns- Everything hurts a lot more now so get ready to block perfectly as to not take damage.
Puddles- Vomit puddles last a lot longer now
Kumas Statues- Lasers do 30k damage now
"Fools I am the storm incarnate"- As mentioned above, it is impossible to iframe the jump and it will put a mp decaying buff on you.
(Tank) Claw swipe- He attacks you with a quick succession of swipes which normally don't push you, but poise is still a bit glitchy so prepare for the occasional push.
Yana
Positioning:
No positioning (Yana is stationary)
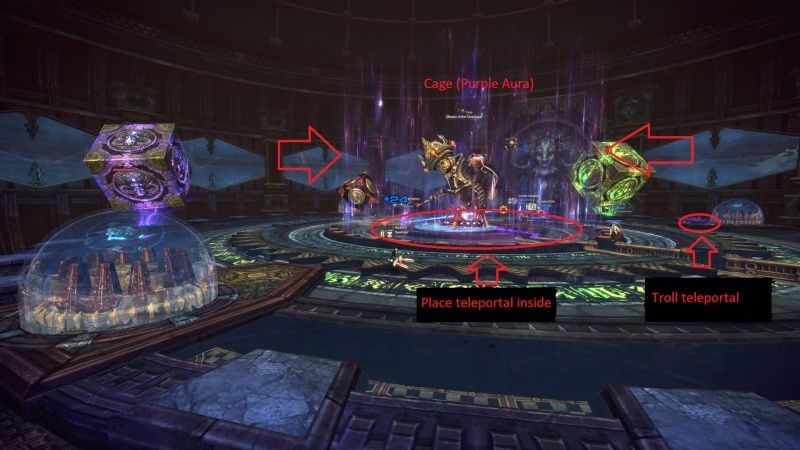
If you get an orange circle around you, it means a teleportal will spawn on your position. The teleportal is needed to escape Yana's cage. Put these inside the area where the cage would be but not too close to Yana as dps might step in them by accident.
Noteworthy Attacks:
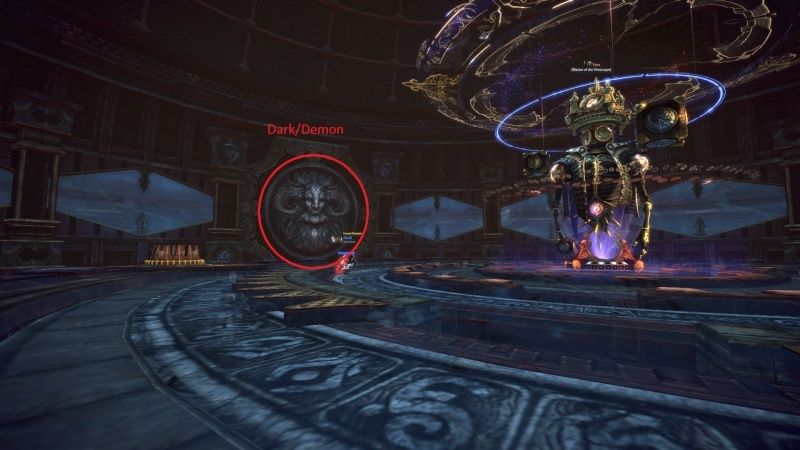
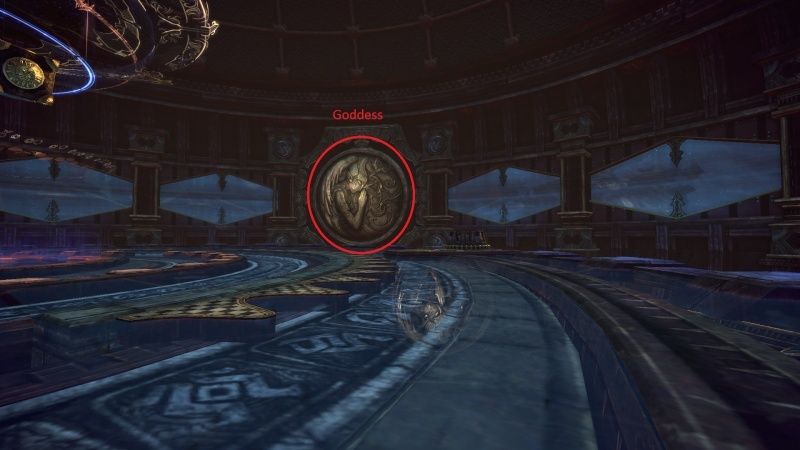
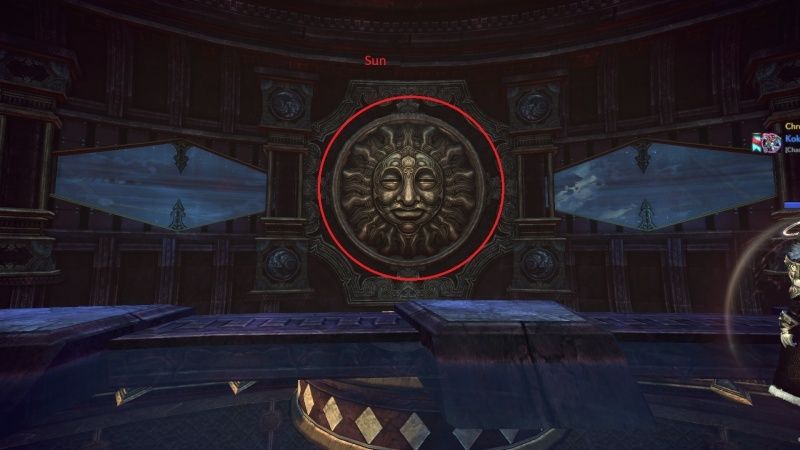
Timescape Murals- There will be three murals in the arena - Dark/Demon mural(Purple), Goddess mural(Green), Sun mural(Red). You must align the three rings to match the mural that is currently glowing. If you fail to align it in time, Yana will absorb that mural's power. If he absorbs all 3, it will result in an immediate wipe. For each mural he consumes, he gets a buff.
Cube Storm- Yana will do a 360 aoe that does massive damage. When you first engage him, he almost always uses Cube Storm. After that, it's random.
Inner Ring- To move the inner ring, attack Yana until his Seal bar fills up (like timelost meadow) and then press (F) next to him.
Middle Ring- Yana will say "Open your mind to all of time and space!" This will let you know that he is about to use the doughnut attack which allows players to turn the middle ring by receiving damage from it. The doughnut deals 140k damage in normal mode. The damage is shared by however many players are on the middle ring. 1 person receives 140k damage, 2 people receive 70k each.
(Mystic's Thrall, Gunner's Turret, Warrior's Shadow all count as a body. Sorceror's Mana Barrier, Warp Barrier, Gunner's Recall can be used to negate damage. Priest's Kaia's shield and Warding Scrolls can negate at least some of the damage.)
Outer Ring- To move the outer ring, destroy one of the three time devices around the arena.
"Who are you to touch my statue?"- Yana will turn the outer ring. To stop this from happening, stun him.
Pyong Pyong- Some annoying minions will come and suicide bomb whoever has aggro. Yana says, "Come, my beautiful children!"
Cage- Yana will say "Who is so bold as to enter my realm?" A purple cage will spawn surrounding the inner ring. Players can escape simply by walking out at this stage.
Yana will say "Let's roll the dice and decide your fate, shall we?", which will lock the cage down necessitating the use of a teleportal to escape.
Yana will say "My power has been gathering in this realm!" This is it. Everyone still in the cage at this point is dead, Game Over.
Sucky Sucky- Yana will clap his hands and suck everyone in
Random secondary aggro attacks- Yana will shoot a breath of flames at someone staggering them continuously rendering them immobile. Alternatively, he will leash you and teleport you under him.
Hard Mode:
Noteworthy Attacks:
Outer Ring- When you destroy all three time devices/bubbles, it will place a debuff on the entire team which must be cleansed as soon as possible.
"Who are you to touch my statue?"- Because of the time device debuff in hard mode, it is recommended to let Yana turn the outer ring as much as possible so refrain from stunning if the outer ring is not set.
Middle Ring- Middle ring deals 280k damage now. Gunners and sorcerers are still viable here but if a priest wants to take the damage with kaia's shield, they will need two other people to take damage with.
Timewave- A random person will get secondary aggro and Yana will slam his hands down dealing 40k fixed damage.
Cage- Players outside the cage are silenced.
Murals- Each mural has a different mechanic in hard mode. The Sun and Goddess debuffs aren't too troublesome and if you are far into the fight, do not reset. If you get the Devil debuff, it is easier to reset and start the boss fight over again (unless Yana is nearly dead) If Yana receives a buff from one of the murals, it can be removed by aligning the same mural once it glows again.
Sun~ Yana receives a shield and everyone will be blinded every now and then.
Goddess~ Yana receives a 30% attack speed buff and doubled defense.
Devil~ Everyone receives a debuff which kills someone every fifteen seconds if not cleansed. It also has Bleed/DoT effect.
There will be three spheres in this room. I will refer to them relative to the position you are before you go into the room. The closest one is 'left'(1), the second closest is 'right'(3) and the farthest is 'back'(2)
Orbs 1 and 2 will have an orange shield around them. The shield inflicts a fixed damage of 10k every time you hit it. (3 mil thunder strike will return the same damage as a 20k auto attack and if you have something that hits a lot of times like warrior's traverse cut or gunner's arcane barrage with HB out, you're as good as dead) The unshielded orb will spawn mobs once it reaches a certain hp. Mobs will also spawn after a fixed amount of time. Each orb has a mechanic. The mechanic can either be the donut, ring, stun/sleep, or dot.
Donut: if it has been cast on you, don't move because the donut moves with you and you might just end up killing your team if you dance and prance around like a madman.
Ring: if it has been cast on you, count 4-4.5 pulses then iframe or you will receive 40k damage.
The mobs hit hard and spawn continuously so either have the tank kite them or control them with stuns/staggers/knockdowns which they are easily susceptible to.
There are multiple ways to clear this room.
1. Attack orb 1 (slowly so the healer can keep up with the damage you are receiving) until it is about to be destroyed
2. Move on to orb 2 and repeat step 1
3. destroy the unshielded orb 3 as quickly as possible and then the other two
1. Attack orb 1 until it is about to be destroyed
2. Move on to orb 2 and repeat step 1
3. Have a gunner use balder's vengeance on orb 1 and 2 and the healer sleep/stun orb 3, then dps orb 3 as quickly as possible.
1. Destroy orb 1
2. Destroy orb 3
3. Destroy orb 2
Hemera
There will be four orbs like the ones in the sphere room, but they will play a different role here. Overlooking from the bridge, the orb closest to you will be orb 1 while the one on the left is orb 2, the one on the right is orb 4 and the farthest one is orb 3.
Orb 1: stun/sleep
The stun/sleep countdown lasts 5 seconds, if it is not cleansed by then, a stun/sleep is received which cannot be cleansed.
Orb 2: large donut
There will be a large donut around the tank. Healers and ranged stay outside of it while melee dps stay inside. (Don't move if you're the tank)
Orb 3: dot
Debuffs players with DoT, bleed, sleep. cleanse as soon as possible
Orb 4: small donut
The small donut lasts for 5 pulses then explodes damaging the tank and everyone else in the AoE and cannot be blocked but CAN be iframed
Positioning:
In timescape normal mode, you will only be using orbs 2 and 4 because their mechanics are easy to deal with in comparison to orbs 1 and 3. The tank/person with highest aggro will always be the victim of the orb mechanic.
The tank will want to bring the dragon to orb 2 and then orb 4 ignoring orbs 1 and 3. (Position the dragon so the dps can back crit but avoid hitting the orb)
Once orb 2 is about to explode, a message will display telling you it is about to explode. Make sure the orb explodes before you leave because if it is not destroyed, it will not recover hp. When the orb explodes, it will leave a large white DoT area.
Once orb 2 has exploded, move onto orb 4 until it too explodes. If both orbs are recovering hp, simply kite the dragon until one of them is fully recovered.
Noteworthy Attacks:
Shield/Orbs- There will be a blue shield around Hemera whenever he is not near an orb. It inflicts fixed damage of 10k every time you hit it, so don't hit it.
To make the shield dissipate, the tank needs to lure Hemera to one of the orbs. The orbs will receive damage while he is near them and the orbs can also be damaged by player attacks. (Do NOT attack the orbs)
Tail 'Bitch Slap'- does around 30-40k damage
Whirlwind- Below 50% hp, He sucks up air and releases, pushing you away and dealing heavy damage (70k)
"We will meet again"- Hemera flies up and comes back down to attack and then leaves a dot on the ground. Stun him as soon as you see this message.
Arcane Vomit- He spits out 3 electric balls dealing heavy damage (You can tell by secondary purple aggro circle)
Hard Mode:
After defeating Hemera, his brother Emeres will spawn. Emeres is considerably stronger. His "We will meet again" phase cannot be canceled via stun. He deals 30-40k damage in normal attacks.
Positioning:
There are two positions which you will be using for Emeres. Each entrance will be surrounded with a large red DOT. To prevent being damaged by this, or preventing your healer from cleansing you, you must position yourself closer to the middle instead of at the end.
Noteworthy Attacks:
(Tank)"We will meet again"- Eremes flies up into the air and shoots short-lived DOT puddles in the direction he is facing. The tank must have Eremes face away from the rest of the team until he starts to fly, which locks him in animation. After he is locked in the animation, simply move away and resume position.
Skadoosh- Whenever Eremes lands(he has to come down to land whenever he flies up), he will do a colossal amount of damage capable of one hit ko's, so make sure to either get out of the immediate area or block it.
Normal Attacks/Tail Swipes- These hit hard. Tank should try to take as little damage as possible or else healer won't be able to keep up and once tank dies, everyone is doomed.
(Healer)Steroids- When the spheres explode, Eremes will receive a buff. The buff lasts 5 seconds and can be plagued(priest)/regressed(mystic). If you do not get rid of the buff in time, he will receive a 30 second buff which debuffs your team with bleed and 1hko's which need to be cleansed.
Orb effects- All the effects of the orb will occur throughout the battle and the healer must be prepared to cleanse everyone within 5 seconds but it is also the dps/tank's job to gather as to make it easier on the healer. If you get the ring, it explodes on the fifth pulse so iframe it on the 4th while transitioning into the 5th.
When an orb is destroyed, it will say "The orb protects and empowers the Dark-World Dragon" You can also just look at the gigantic red aoe
Timelost Meadow
There will be a bunch of trash mobs. Gather, bring them to the destination, kill them until the Timelost Soul bar fills up to 100. After the bar fills up, interact with the shrine to despawn all the mobs.
Tempas
Positioning:
(Warning) Sometimes he can push you even though the tier 8 update was supposed to make tanks immovable. It's seemingly random so just hope for the best?
1. In the middle, stack his poison breath on top of each other and simply step to the side when he does it covering up 3 sides max but leaving one to escape.
2. Each wall that isn't an entrance
3. Wherever you can find empty space
Modified Positioning: Tank in the middle of the room until you feel that you are running out of space or something goes wrong and you need to reposition. Move to the walls. If you have decent dps, this way of positioning should take him from 100% to 0% hp without ever having to worry about poison pools.
Noteworthy Attacks:
Purple Vomit- a normal breath attack common to all kumases, this one takes it a step farther and vomits on the ground creating a dot puddle. (dot can be cleansed and puddles eventually disappear)
Fake Purple Vomit- He does the purple vomit animation but spits out nothing
You can tell if he's going to use purple vomit by looking for the poison symbol
Lightning Orbs- Everytime you are caught in purple vomit, a lightning orb will spawn. Lightning orbs can be destroyed and debuffs like slows, stuns, etc. will drive them crazy and they will stray from their circular path for a short amount of time.
Kumas Statues- Once a lightning orb comes into contact with a kumas statue, the statue will shoot a line of electricity that deals 15k damage to a seemingly random target.
Up, Up, and Away- He jumps up into the air and upon hitting the ground, sends you flying upwards. Iframe it (While in the air you are vulnerable to other attacks)
"Fools! I am the storm incarnate"- He does 'Up, Up, and Away but this time if you get hit, you will receive a debuff. He also sets off all the kumas statues. Lasers everywhere
Hard Mode:
On hard mode, many attacks/mechanics aren't iframeable so instead of iframing the lasers or iframing Tempas' jump in "storm incarnate", you must simply move out of the way of lasers and facetank the jump damage and debuff. It is important to make it easier for your healer to cleanse/heal you so try to stay together.
Noteworthy Attacks:
(Tank)Normal Kumas Attack Patterns- Everything hurts a lot more now so get ready to block perfectly as to not take damage.
Puddles- Vomit puddles last a lot longer now
Kumas Statues- Lasers do 30k damage now
"Fools I am the storm incarnate"- As mentioned above, it is impossible to iframe the jump and it will put a mp decaying buff on you.
(Tank) Claw swipe- He attacks you with a quick succession of swipes which normally don't push you, but poise is still a bit glitchy so prepare for the occasional push.
Yana
Positioning:
No positioning (Yana is stationary)
If you get an orange circle around you, it means a teleportal will spawn on your position. The teleportal is needed to escape Yana's cage. Put these inside the area where the cage would be but not too close to Yana as dps might step in them by accident.
Noteworthy Attacks:
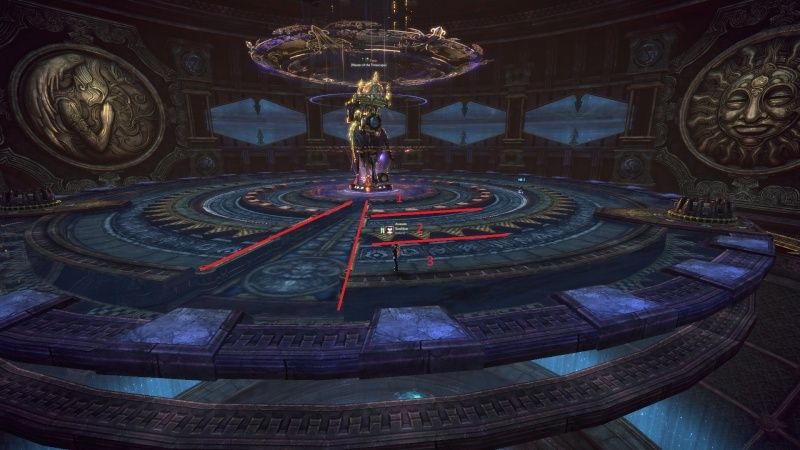
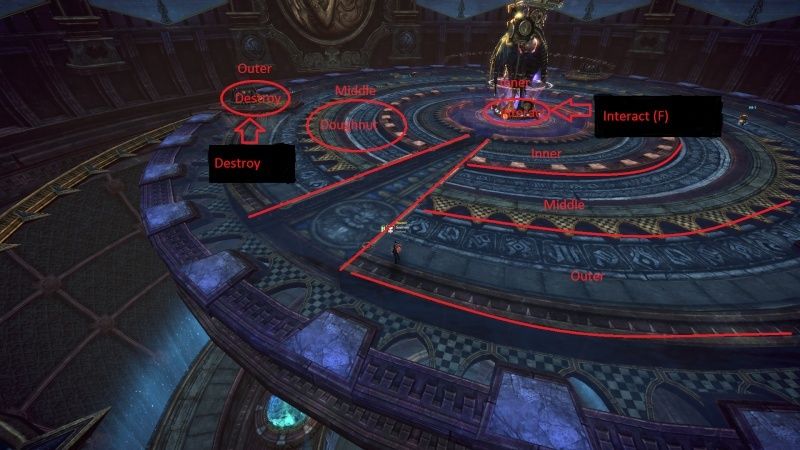
Timescape Murals- There will be three murals in the arena - Dark/Demon mural(Purple), Goddess mural(Green), Sun mural(Red). You must align the three rings to match the mural that is currently glowing. If you fail to align it in time, Yana will absorb that mural's power. If he absorbs all 3, it will result in an immediate wipe. For each mural he consumes, he gets a buff.
Cube Storm- Yana will do a 360 aoe that does massive damage. When you first engage him, he almost always uses Cube Storm. After that, it's random.
Inner Ring- To move the inner ring, attack Yana until his Seal bar fills up (like timelost meadow) and then press (F) next to him.
Middle Ring- Yana will say "Open your mind to all of time and space!" This will let you know that he is about to use the doughnut attack which allows players to turn the middle ring by receiving damage from it. The doughnut deals 140k damage in normal mode. The damage is shared by however many players are on the middle ring. 1 person receives 140k damage, 2 people receive 70k each.
(Mystic's Thrall, Gunner's Turret, Warrior's Shadow all count as a body. Sorceror's Mana Barrier, Warp Barrier, Gunner's Recall can be used to negate damage. Priest's Kaia's shield and Warding Scrolls can negate at least some of the damage.)
Outer Ring- To move the outer ring, destroy one of the three time devices around the arena.
"Who are you to touch my statue?"- Yana will turn the outer ring. To stop this from happening, stun him.
Pyong Pyong- Some annoying minions will come and suicide bomb whoever has aggro. Yana says, "Come, my beautiful children!"
Cage- Yana will say "Who is so bold as to enter my realm?" A purple cage will spawn surrounding the inner ring. Players can escape simply by walking out at this stage.
Yana will say "Let's roll the dice and decide your fate, shall we?", which will lock the cage down necessitating the use of a teleportal to escape.
Yana will say "My power has been gathering in this realm!" This is it. Everyone still in the cage at this point is dead, Game Over.
Sucky Sucky- Yana will clap his hands and suck everyone in
Random secondary aggro attacks- Yana will shoot a breath of flames at someone staggering them continuously rendering them immobile. Alternatively, he will leash you and teleport you under him.
Hard Mode:
Noteworthy Attacks:
Outer Ring- When you destroy all three time devices/bubbles, it will place a debuff on the entire team which must be cleansed as soon as possible.
"Who are you to touch my statue?"- Because of the time device debuff in hard mode, it is recommended to let Yana turn the outer ring as much as possible so refrain from stunning if the outer ring is not set.
Middle Ring- Middle ring deals 280k damage now. Gunners and sorcerers are still viable here but if a priest wants to take the damage with kaia's shield, they will need two other people to take damage with.
Timewave- A random person will get secondary aggro and Yana will slam his hands down dealing 40k fixed damage.
Cage- Players outside the cage are silenced.
Murals- Each mural has a different mechanic in hard mode. The Sun and Goddess debuffs aren't too troublesome and if you are far into the fight, do not reset. If you get the Devil debuff, it is easier to reset and start the boss fight over again (unless Yana is nearly dead) If Yana receives a buff from one of the murals, it can be removed by aligning the same mural once it glows again.
Sun~ Yana receives a shield and everyone will be blinded every now and then.
Goddess~ Yana receives a 30% attack speed buff and doubled defense.
Devil~ Everyone receives a debuff which kills someone every fifteen seconds if not cleansed. It also has Bleed/DoT effect.

Dignity- Posts : 34
Join date : 2015-10-15
Valkyrie :: Guides :: Dungeon Guides
Page 1 of 1
Permissions in this forum:
You cannot reply to topics in this forum|
|
|